Dimensions
Dimensions are how Cloud Ctrl converts raw, inconsistent cloud tagging into a structured business context you can use for reporting and cost allocation. A dimension represents a concept that matters to your organisation — such as Environment, Team, Project, or Cost Centre — regardless of how that concept is expressed across your cloud estate.
Once configured, a dimension appears as a filter, grouping, and Cost Explorer tab throughout Cloud Ctrl, giving you a unified view of spend across all your cloud providers.
Key Concepts
| Concept | Description |
|---|---|
| Dimension | A named business category (e.g. Environment, Team) that cost data can be grouped and filtered by. |
| Tag Key | The raw label name used by a cloud provider (e.g. environment, Env, env). Multiple tag keys from different providers can be mapped to the same dimension. |
| Canonical Form | The clean, standard value Cloud Ctrl uses in reports (e.g. Production). All variant spellings resolve to this. |
| Variant | A raw tag value that should be treated as equivalent to a canonical form (e.g. prod, PROD, prd). |
| Pinned | A dimension marked to appear as a dedicated tab in Cost Explorer. |
| Hierarchy | An ordered set of up to 3 dimensions used to build a drill-down cost tree (e.g. Division → Team → Environment). |
Navigation
Go to Settings → Dimensions. The page has three tabs:
| Tab | Purpose |
|---|---|
| Dimensions List | Create, rename, describe, pin, and delete dimensions. |
| Tag Mappings | Connect raw cloud tag key names to your dimensions. |
| Normalisation | Unify inconsistent tag values into canonical forms. |
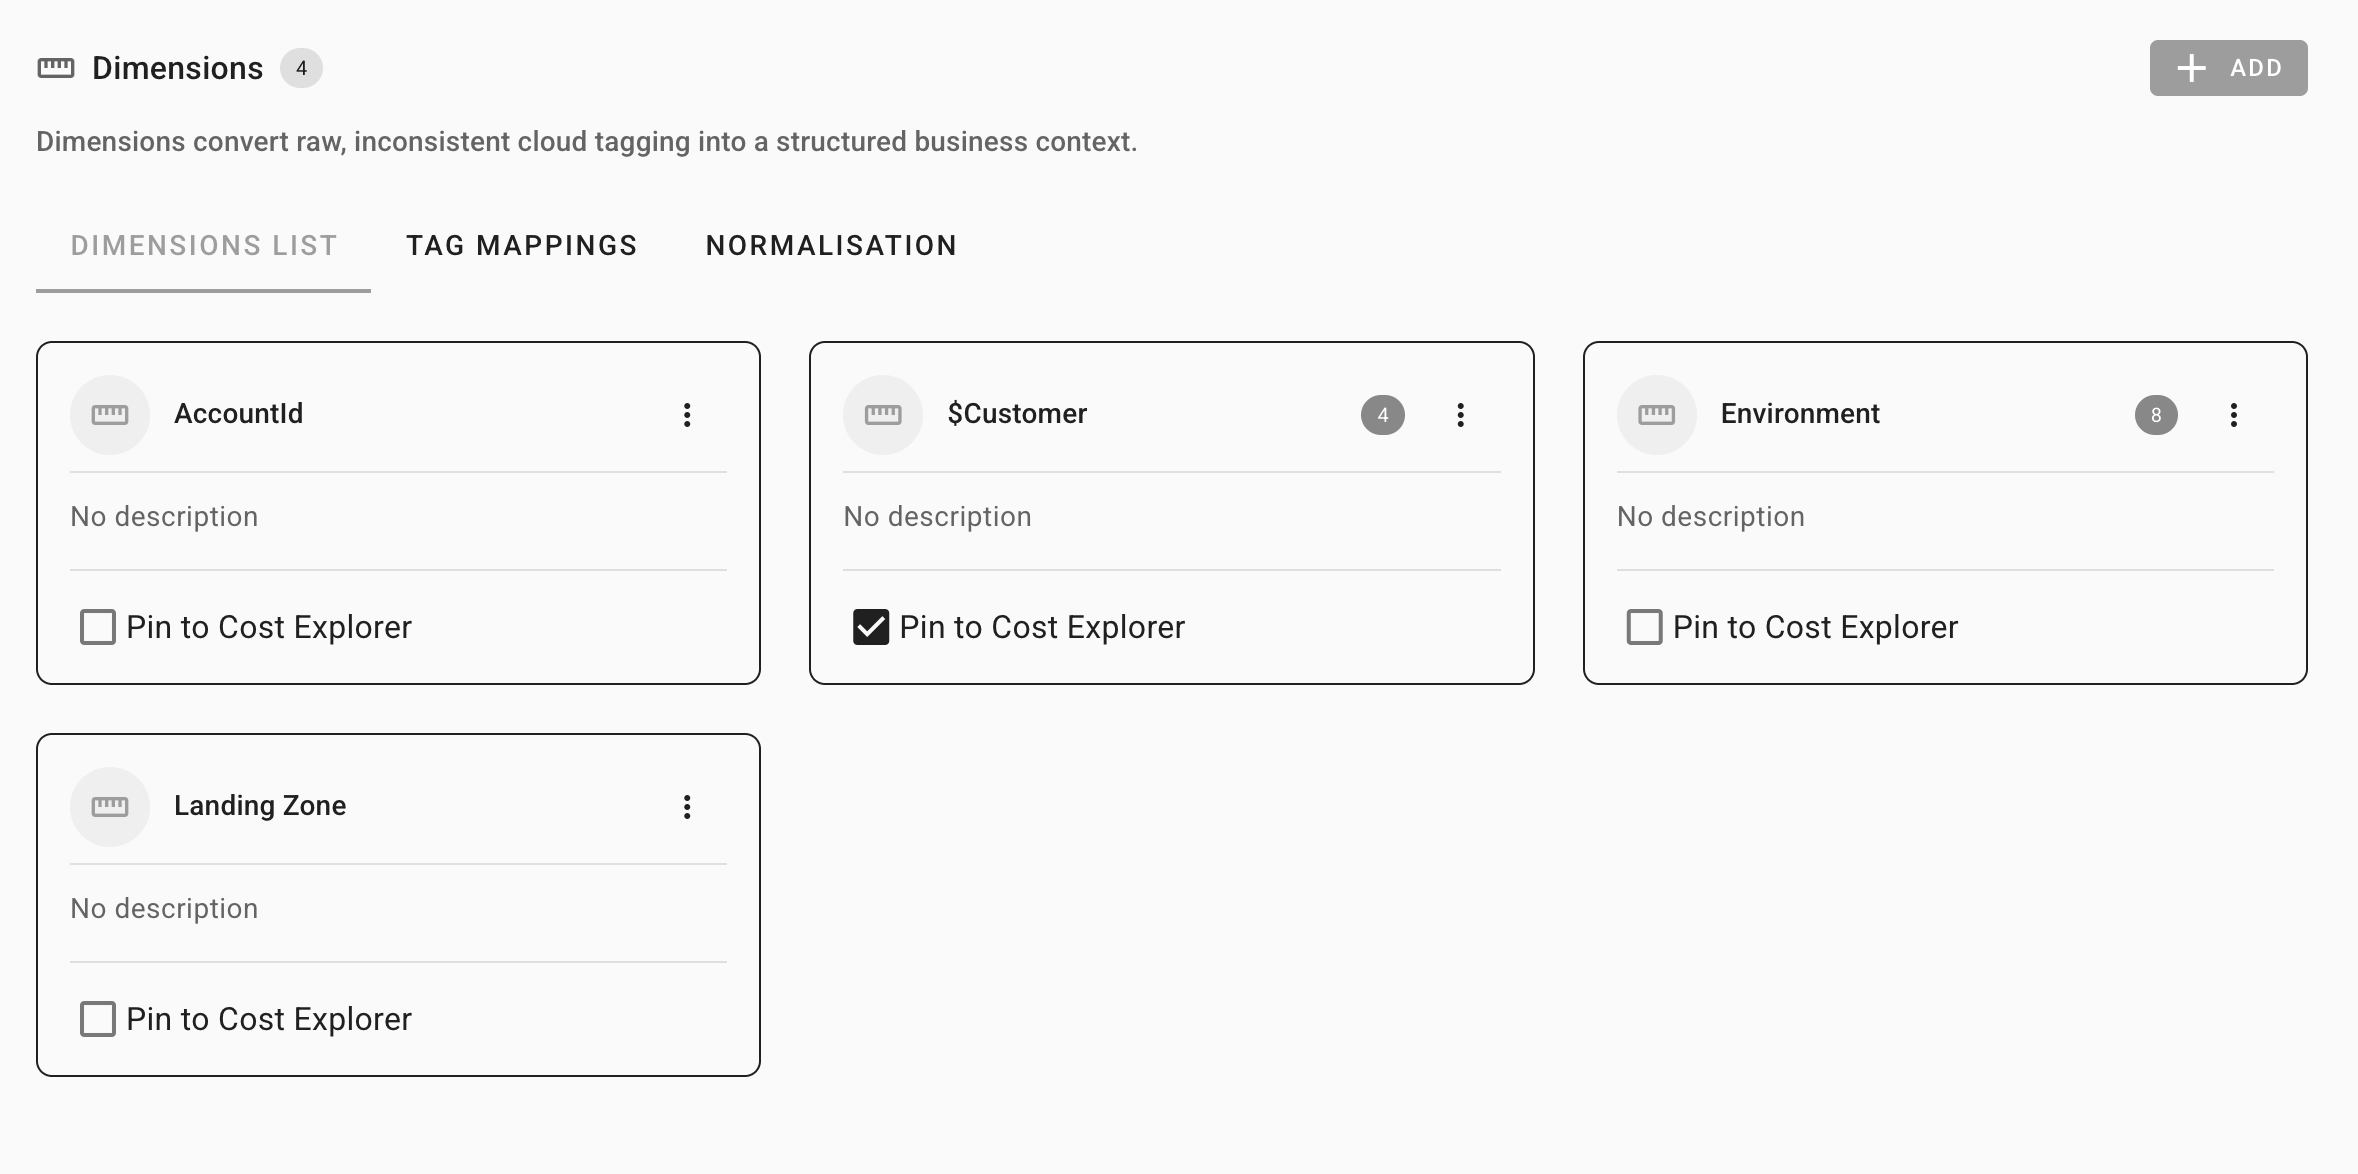
Dimensions List
This tab shows a card for each dimension you have configured.
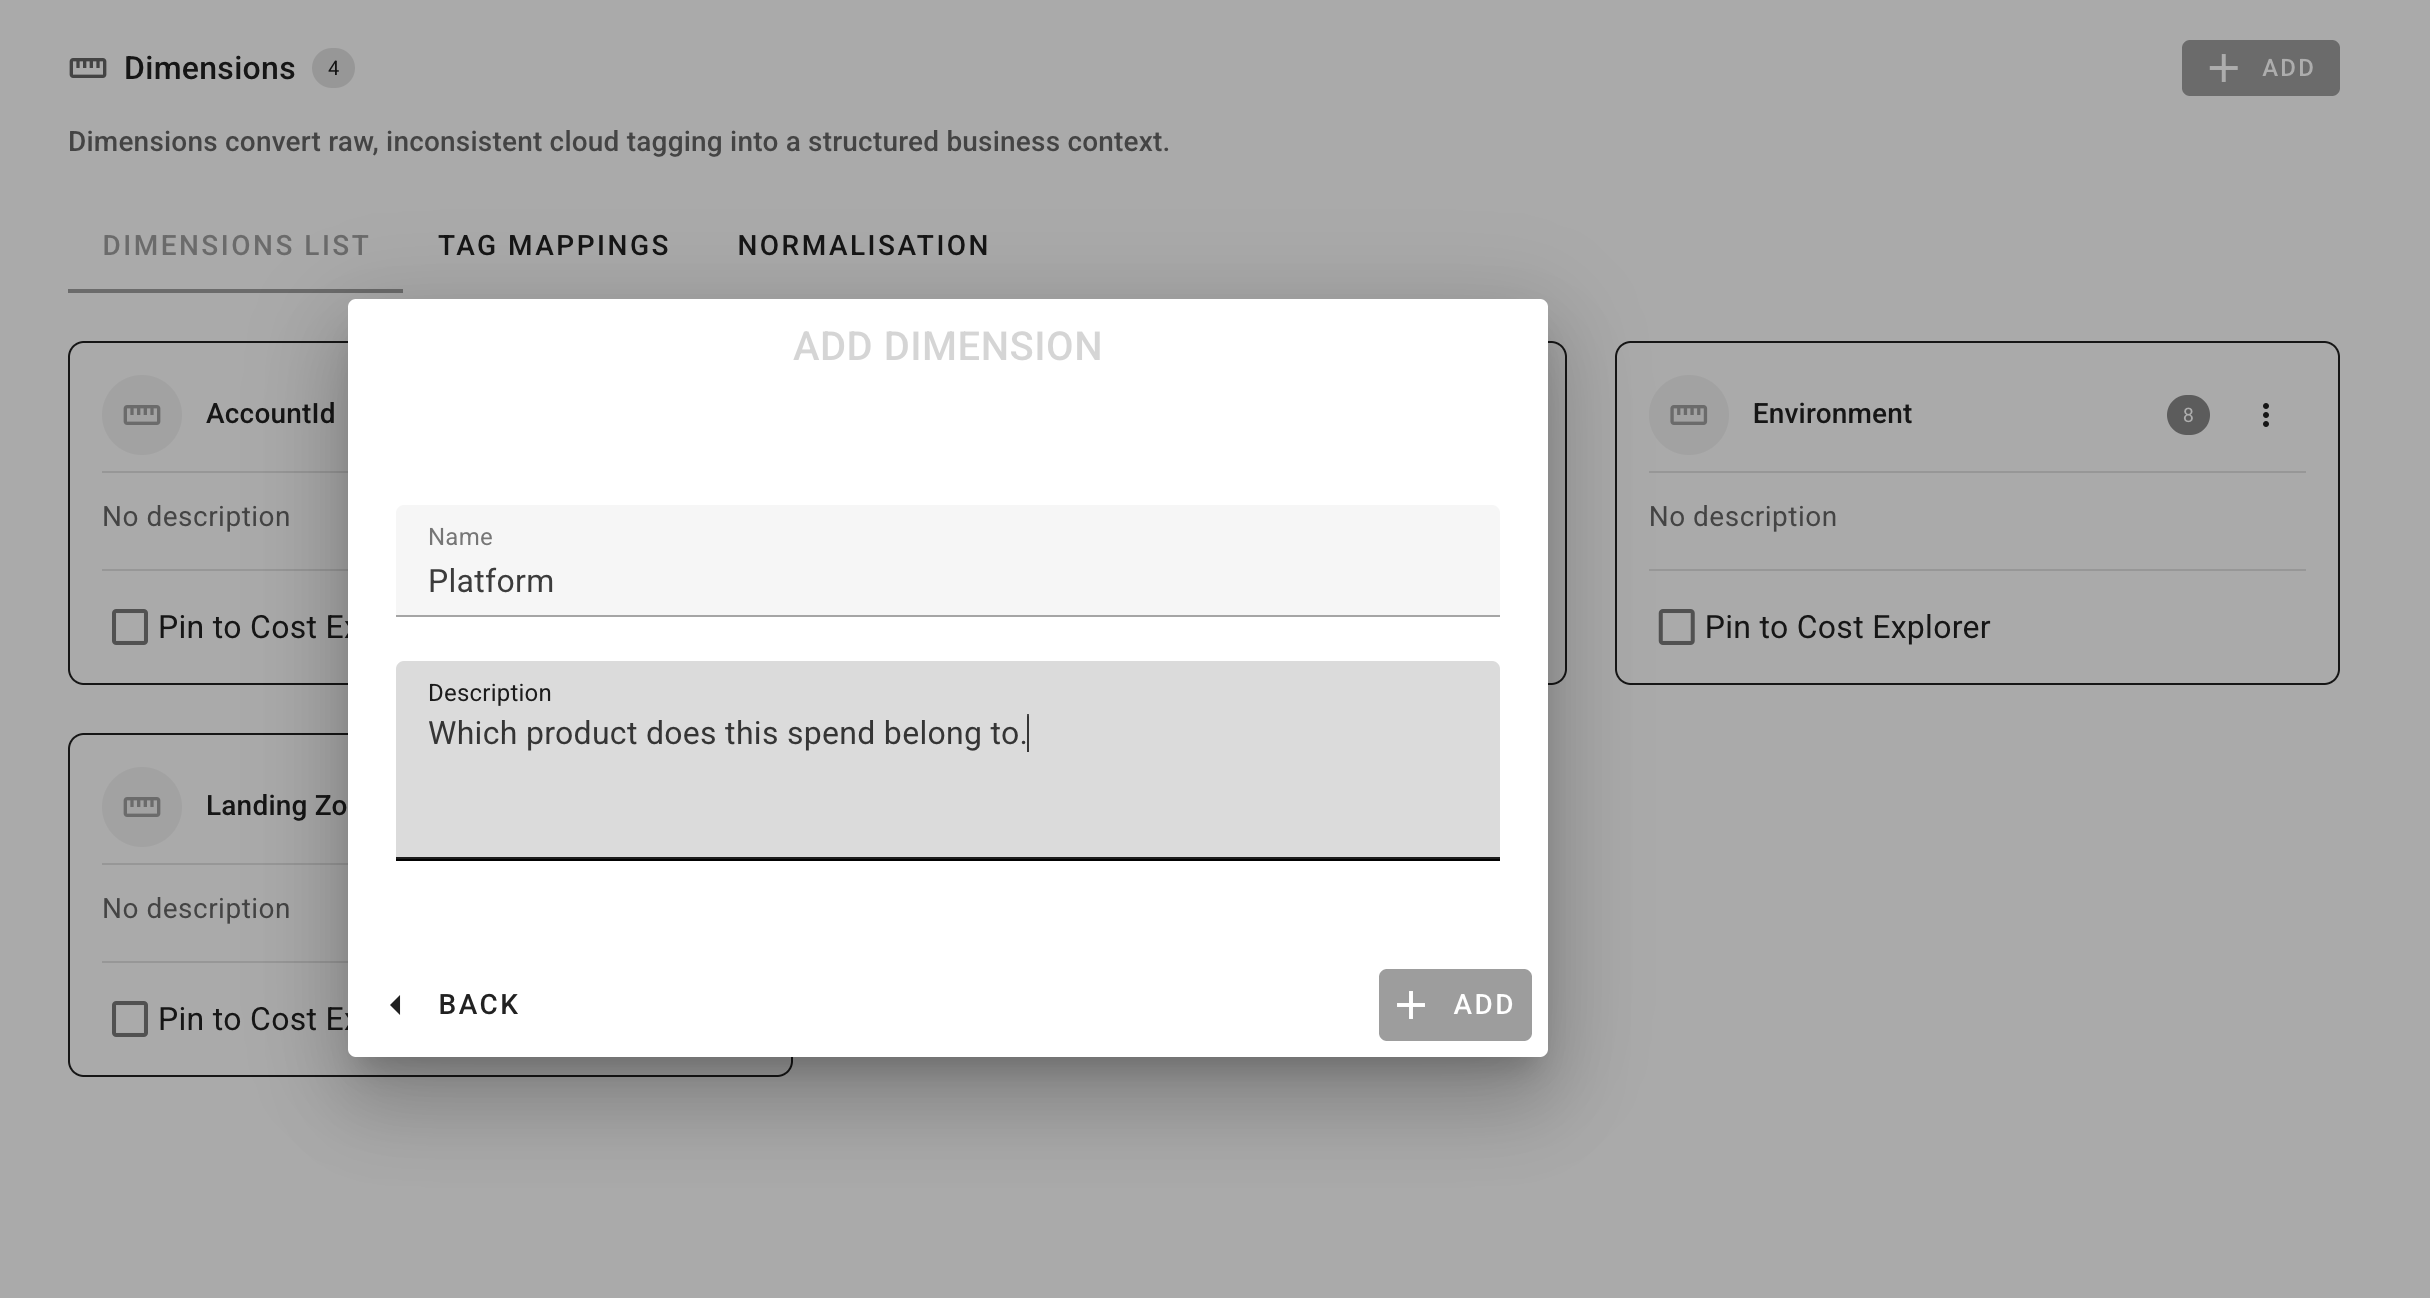
Creating a Dimension
- Click Add (top right).
- Enter a Name — this appears in Cost Explorer filters and reports (e.g.
Environment). - Optionally add a Description to help other users understand what it represents.
- Click Save.
The dimension is created immediately but will not appear in reports until you map at least one tag key to it.
Editing or Deleting
Click the ⋮ menu on a dimension card to rename/describe it or delete it.
When a dimension is deleted, Cloud Ctrl schedules a re-import of up to 12 months of historical cost data to remove it from your records. This typically completes within 2 hours.
Warning
Deletion is permanent. All tag key mappings and normalisation rules for the dimension are removed.
Unnormalised Value Badge
A red badge on a dimension card shows the count of tag values in your usage data that have not yet been assigned to a canonical form. Click the badge to jump directly to the Normalisation tab for that dimension.
Tag Mappings
Tag mappings tell Cloud Ctrl which raw cloud tag key names correspond to each of your dimensions. This is the step that connects cloud provider tags to your business vocabulary.
Cloud providers use different conventions for the same concept. For example, your Environment dimension might need to be populated from environment (Azure), Env (AWS), and env (GCP). Mapping all three to the same dimension gives you a unified view across providers.
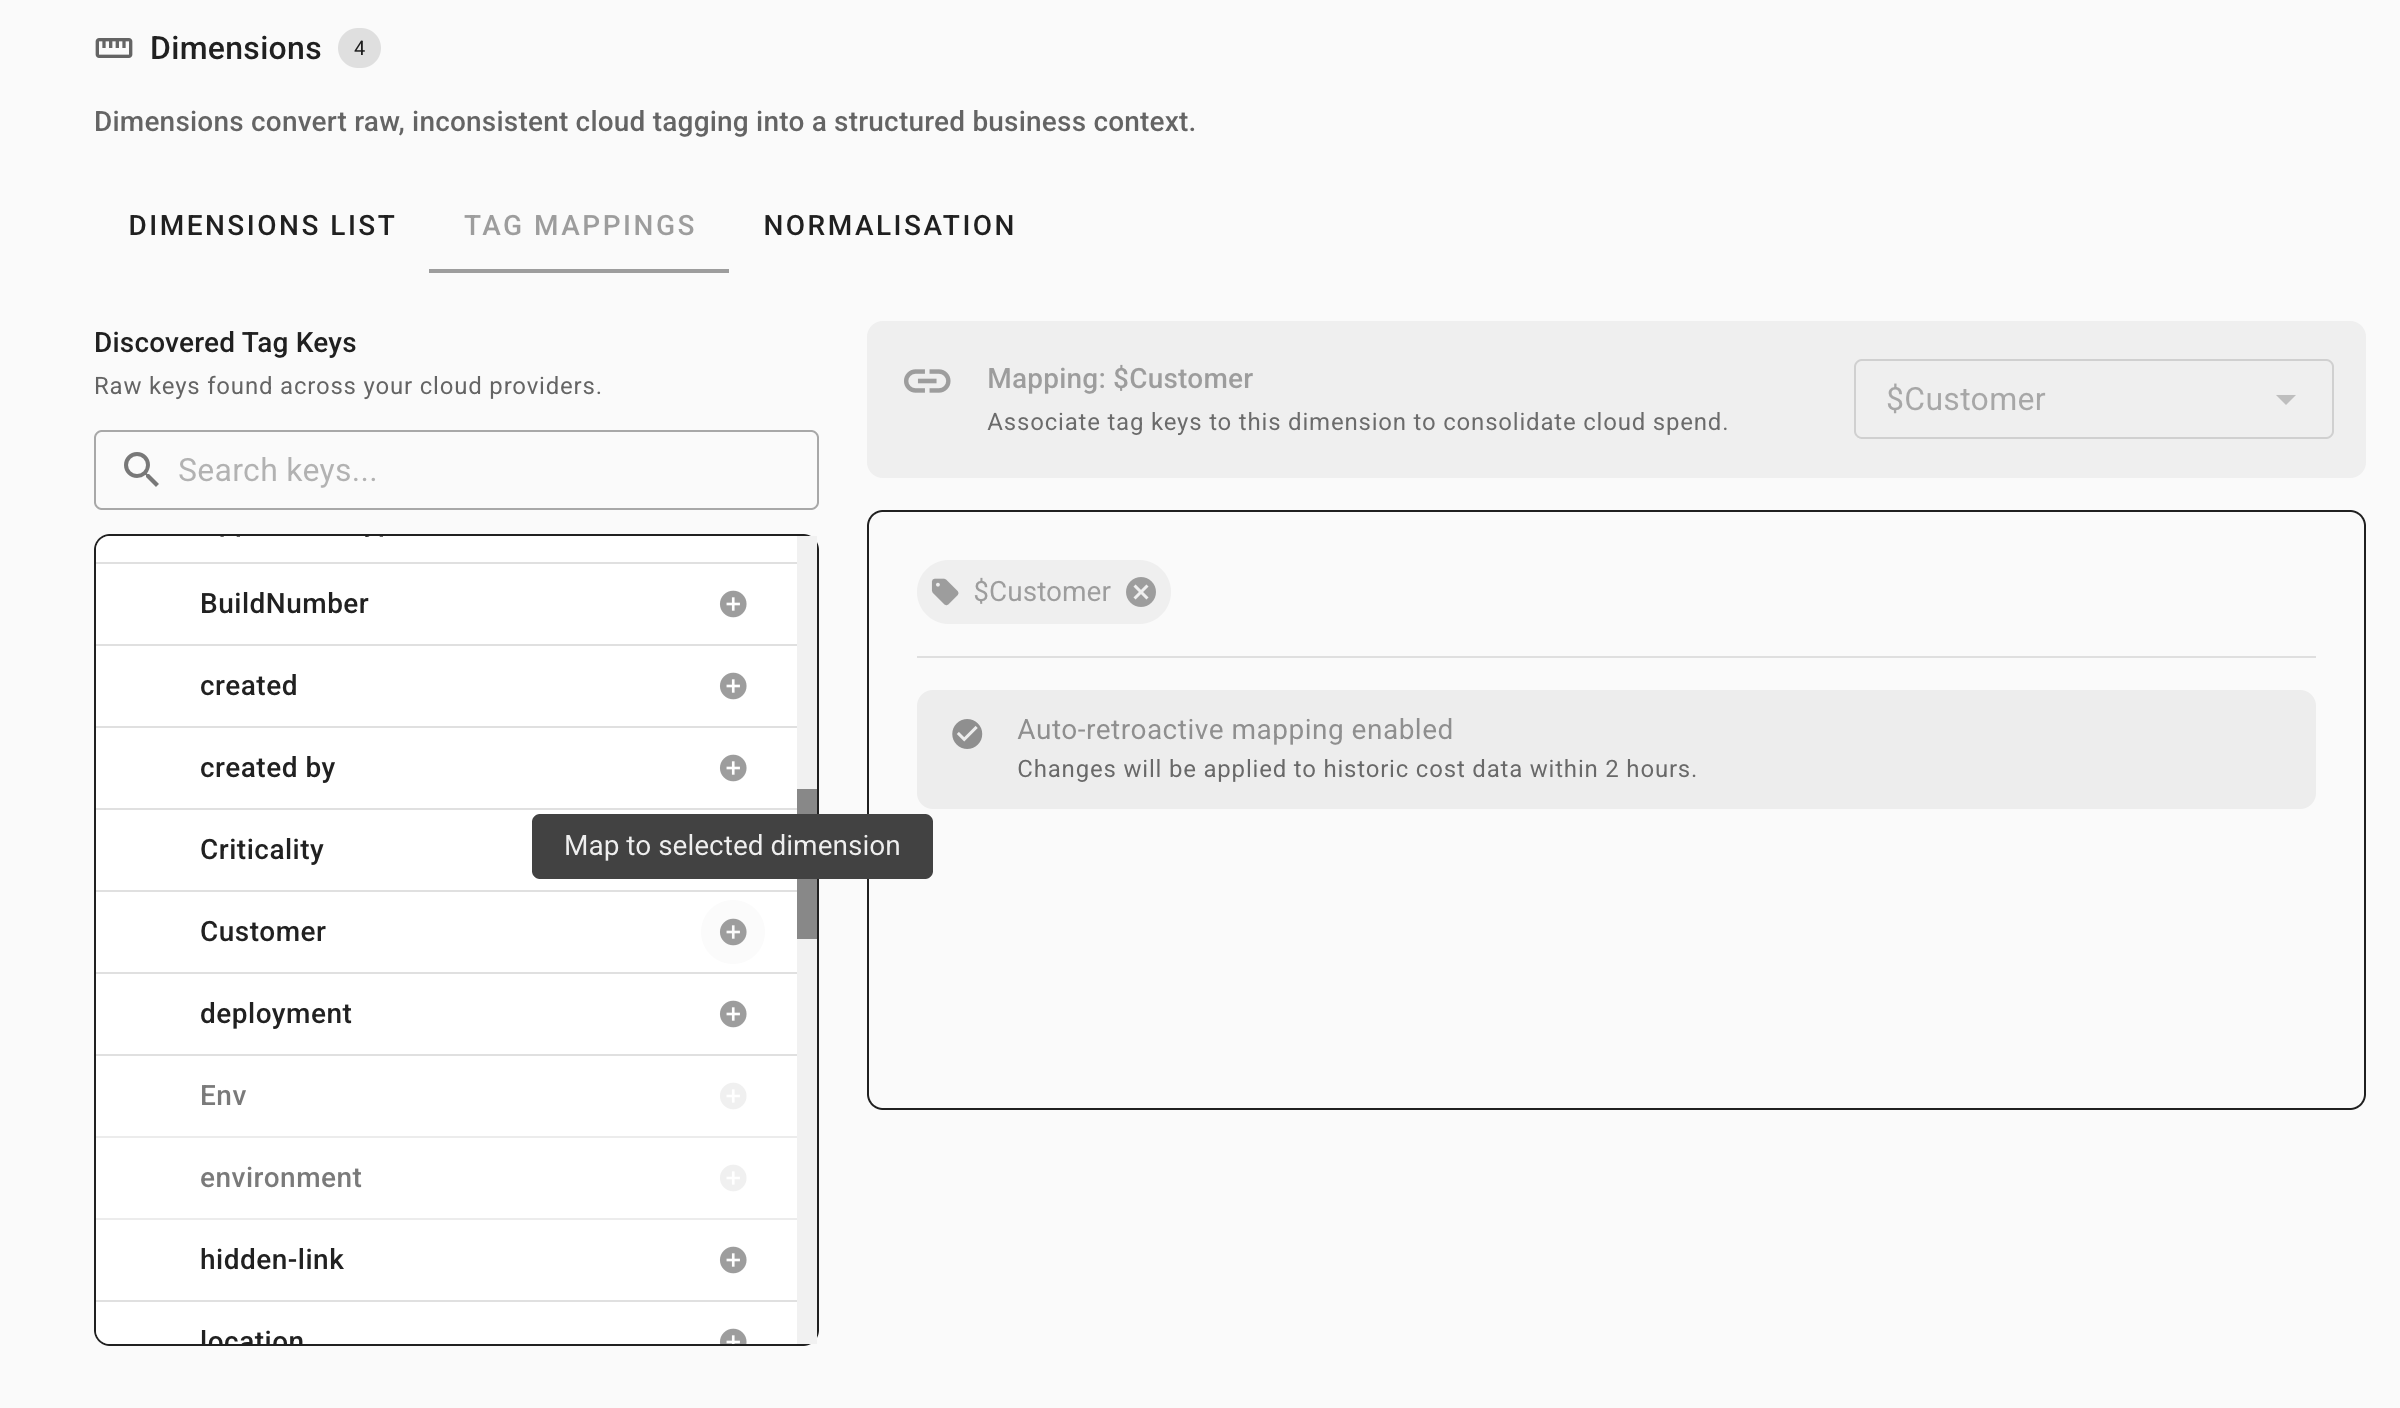
How to Map a Tag Key
- Go to the Tag Mappings tab.
- The left panel — Discovered Tag Keys — lists every tag key Cloud Ctrl has observed across your connected cloud accounts, with provider badges and the date each key was first discovered.
- In the right panel, select the dimension you want to map to.
- Click the + icon next to a tag key in the left panel to map it.
- The tag key appears as a chip in the dimension's panel. A green tick confirms it is mapped.
To remove a mapping, click ✕ on a tag key chip in the right panel.
First-Match-Wins
A dimension can have multiple tag keys mapped to it. During cost ingestion, Cloud Ctrl checks each mapped tag key in order and uses the first one found on the resource. This lets you define a priority order for fallback keys.
Tips
A tag key can only be mapped to one dimension at a time. Greyed-out tag keys in the left panel are already mapped to another dimension.
Retroactive Re-import
Adding or removing a tag key mapping triggers an automatic re-import of up to 12 months of historical cost data. Changes are reflected in your reports within approximately 2 hours.
Normalisation
Even after mapping tag keys, values applied by engineers are often inconsistent — production, prod, PROD, and prd all mean the same thing but appear as separate entries in reports without normalisation.
The Normalisation tab lets you define canonical forms — the authoritative value Cloud Ctrl uses in reports — and map all variant spellings to them.
The Two-Column View
| Column | Description |
|---|---|
| Unnormalised | Tag values in your usage data not yet assigned to a canonical form. Click any chip to assign it. |
| Canonical Forms | Your defined canonical values, each showing their associated variants. |
Creating a Canonical Form
- Click New Canonical Form.
- Enter the clean, standard value you want to appear in reports (e.g.
Production). - Click Save.
Adding Variants
A variant is a raw tag value that should resolve to the canonical form.
- Expand a canonical form.
- Click Add variant.
- Enter the raw value (e.g.
prod). - Optionally enable Case sensitive if the match must be exact.
- Click Save.
Tips
Click an unnormalised value chip in the left panel to open an assign dialog — this maps the value to an existing canonical form in one step without manually typing a variant.
Removing Variants and Forms
- Click ✕ on a variant chip to remove it. The value returns to the unnormalised list if still present in your usage data.
- Expand a canonical form and click Delete to remove the form and all its variants.
Normalisation changes are applied retroactively within approximately 2 hours.
Pinning Dimensions to Cost Explorer
Pinned dimensions appear as dedicated tabs in Cost Explorer for quick access to cost breakdowns.
Toggle Pin to Cost Explorer on any dimension card to pin or unpin it. There is no limit on the number of pinned dimensions, but 3–6 is a practical number for most teams.
Dimension Hierarchy
A hierarchy arranges up to 3 dimensions into an ordered drill-down tree used in governance and portfolio views — for example Division → Team → Environment or Business Unit → Project → Service.
The hierarchy is configured by administrators. Only users with Administer permission can set or change the hierarchy order.
Recommended Setup Workflow
For a new configuration, follow these steps in order:
- Create your dimensions — Define the business categories you want to report on. Start with your 3–5 most important ones.
- Map tag keys — For each dimension, map the raw tag key names from your cloud providers. Use the provider badge on each discovered key to identify which cloud it came from.
- Pin the dimensions you use most — Tick Pin to Cost Explorer on the dimensions your team uses for routine reporting.
- Normalise values — Review the unnormalised count on each dimension card and clean up inconsistent values. Start with the highest count.
- Wait for retroactive re-import — Changes are applied to historical data within approximately 2 hours.
- Validate in Cost Explorer — Open Cost Explorer, switch to a pinned dimension tab, and verify spend is categorised correctly.
Limits
| Limit | Value |
|---|---|
| Maximum dimensions per tenant | 30 |
| Maximum hierarchy levels | 3 |
| Retroactive re-import window | 12 months |
FAQ
My dimension shows no data in reports.
A dimension with no mapped tag keys will not appear in spend data. Go to the Tag Mappings tab and assign at least one tag key.
A tag key doesn't appear in the Discovered Tag Keys list.
Cloud Ctrl discovers tag keys from ingested usage data. Confirm the resource is tagged in your cloud provider and that the account has recently completed an import, then check again after the next scheduled import.
Can I map the same tag key to two dimensions?
No — each tag key can only be mapped to one dimension. If you need the same data in two dimensions, use a Tag Mapping Rule to copy the tag value to a second tag key, then map each key to a different dimension.
I added variants but the unnormalised count hasn't changed.
Normalisation changes are applied retroactively within ~2 hours. If the count remains after that, check that the variant value exactly matches the raw value in your usage data (including spaces and special characters).
What happens to historical data when I delete a dimension?
Cloud Ctrl schedules a retroactive re-import of up to 12 months of data. After re-import, the dimension column is removed from those records. Saved reports that reference the deleted dimension may need to be updated manually.