Standard Azure Account Export Setup
For Enterprise Agreement (EA), Microsoft Customer Agreement (MCA), and Pay-As-You-Go (PAYG) accounts, use Azure Cost Management Exports (CME) to import cost and usage data into Cloud Ctrl.
This guide has two paths:
- Recommended: one export at billing account or management group scope
- Alternative: one export per subscription
Microsoft prerequisites are documented here: Azure export prerequisites
Recommended Path: Billing Account or Management Group Export
Use this path when you can configure exports at billing account or management group scope.
Step 1: Open Cost Management Exports
- Sign in to the Azure Portal
- Go to Cost Management + Billing
- Select your available scope:
- Billing Account (EA/MCA), or
- Management Group
- Open Cost Management → Exports
- Click + Add
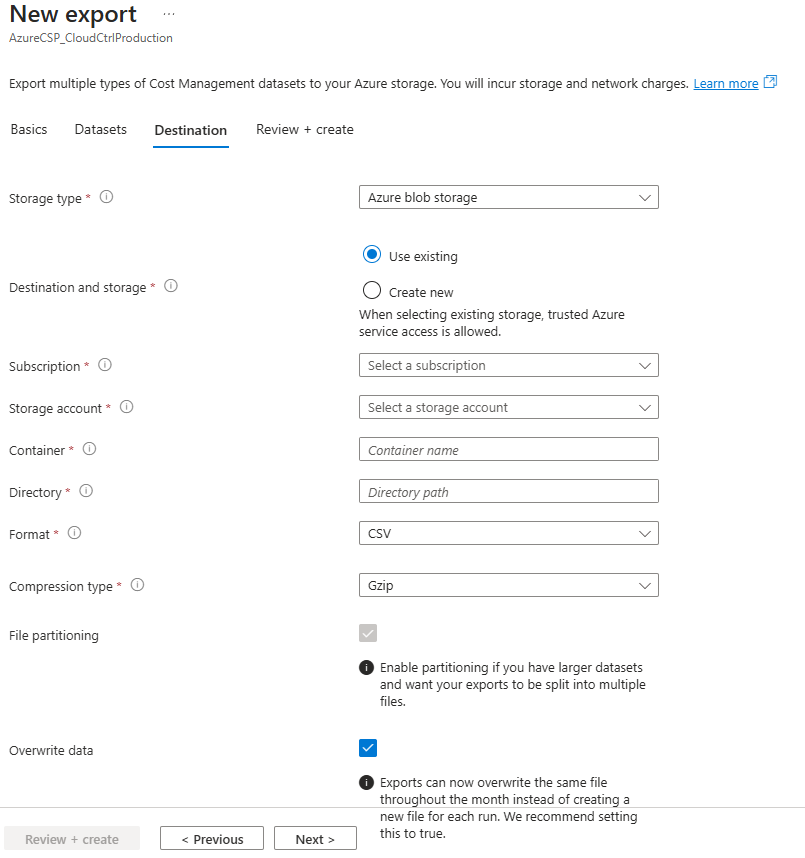
Step 2: Configure the export
| Setting | Value / Recommendation |
|---|---|
| Prefix | cc-export |
| Type | Actual cost |
| Scope | Billing account or management group |
| Schedule | Daily |
| Storage Account | Your dedicated storage account |
| Container | Example: cc-cost-exports |
| File Format | CSV |
| Compression Type | Gzip |
| Overwrite data | Enabled |
Click Review + Create.
Step 3: Verify app permissions
Confirm Application Registration is complete, including:
- Reader (or approved custom role) on subscriptions or management group
- Storage Blob Data Reader on the storage account
Step 4: Add credential in Cloud Ctrl
- Go to Settings → Cloud Connections → Microsoft Azure
- Click + Add Credential
- Choose one:
- Azure Entra App: Tenant ID, Application (Client) ID, Client Secret
- Managed Identity: Storage Account Name, Container Name
- Click Save
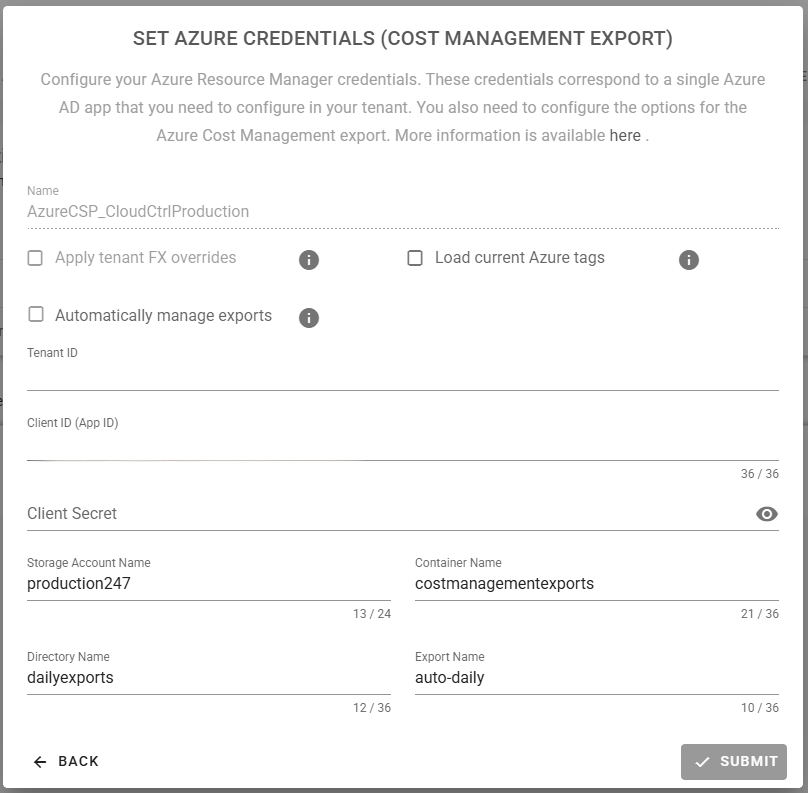
Step 5: Add cloud account in Cloud Ctrl
- In Cloud Accounts, click + Add Cloud Account
- Select the credential
- Choose Microsoft Azure Cost Management Export
- Enter:
- Cloud account name
- Automatically manage exports: leave unchecked for manual export setup
- Storage account name (if using Azure Entra App)
- Container name (if using Azure Entra App)
- Directory name
- Export name
- Click Submit
Step 6: Verify import
After Azure writes export files, Cloud Ctrl starts ingestion automatically.
Alternative Path: Per-Subscription Exports
Use this path when billing account or management group export setup is not available to your role.
Step 1: Create export for each subscription
For each subscription:
- Open Subscription → Cost Management → Exports
- Click + Add
- Configure:
| Setting | Value / Recommendation |
|---|---|
| Prefix | cc-export-{subscription-name} |
| Type | Actual cost |
| Scope | Subscription |
| Schedule | Daily |
| Storage Account* | Your dedicated storage account |
| Container* | Example: cc-cost-exports |
| Directory* | Example: costexports |
| File Format | CSV |
| Compression Type | Gzip |
| Overwrite data | Enabled |
Important: Keep values marked
*consistent across subscriptions.
Step 2: Assign role to app registration per subscription
For each subscription you want imported:
- Open Subscriptions → Access Control (IAM)
- Click Add → Add role assignment
- Assign Reader
- Select your App Registration
- Save
Tips
When a new subscription is added, assign Reader access for the App Registration so it is included in imports.
Step 3: Add credential in Cloud Ctrl
If not already added, create the Azure credential in Settings → Cloud Connections → Microsoft Azure.
Step 4: Add cloud account in Cloud Ctrl
- In Cloud Accounts, click + Add Cloud Account
- Select the credential
- Choose Microsoft Azure Cost Management Export
- Enter cloud account details, including storage account, container, directory, and export names
- Click Submit
Step 5: Verify import
After exports run, Cloud Ctrl begins ingestion.